在游戏中使用动画效果的话能够使我们的对象更加栩栩如生。例如,在有一个篝火精灵,如果它仅仅是一张静态的火焰图片,那么我们看到的火焰似乎没有在燃烧。然而,我们可以通过多张图片让它动起来,这也是我们这篇文章将要介绍的。这里,将会讲到:
一、获取时间
在 SFML 中时间是一个很重要的东西。它的重要性在系列的第二篇中也提到过。游戏世界中变化基于时间而不是帧数的话,那么我们就不会因为电脑性能不同而产生游戏中物体移动速度不一样的bug。这里再来复习一下相关的时间函数。
sf::Time 和 sf::Clock
sf::Time类是我们的时间单位,在 SFML 中,我们可以使用 sf::seconds(), sf::milliseconds(), sf::microseconds() 去初始化我们的时间对象(秒、毫秒、微秒)。使用 Time::asSeconds(), Time::asMilliseconds(), Time::asMicroseconds()。
1
2
3
| sf::Time time = sf::seconds(5) + sf::milliseconds(100);
if (time > sf::seconds(5.09))
std::cout << "It works" << std::endl;
|
sf::Clock 类能够让我们去获取已经过去的时间长短,时间的计算是基于操作系统时钟的。
1
2
3
4
5
| sf::Clock clock;
sf::Time timePassed = clock.getElapsedTime();
|
除此之外,Clock::restart() 也能够获取已经过去的时间长短,但同时它会将时钟重置。
通过上面的介绍,相信大家已经明白如何获取一帧的时间了。
1
2
3
4
5
6
7
8
9
10
11
12
13
14
| sf::Time deltaTime;
sf::Clock clock;
while (window.isOpen()) {
deltaTime = clock.restart();
float dtAsSeconds = deltaTime.asSeconds();
}
|
二、让精灵动起来
实现动画的传统方式是利用多张图片在短时间内绘制出来,进而实现动画效果。虽然这种方法目前仍然被大量采用,但是我们还有更多优雅的做法。这里,我们只探讨传统的做法,在很多情况下,它足以为我们的精灵赋予生命。
步骤
首先,我们需要一个对象的多张图片以便我们去实现它。通常,我们会将它放在一张图片里,这张图片保存了这个对象的不同动作。如下图所示,我们的精灵大小是 32*32 ,总共有 8 帧。

下面的代码显示了我们如何使用
1
2
3
4
5
6
7
| sf::Vector2i spriteSize(32, 32);
sf::Sprite sprite(AssetManager::GetTexture("crystal.png"));
sprite.setTextureRect(sf::IntRect(0, 0, spriteSize.x, spriteSize.y));
int framesNum = 8;
float animationDuration = 1;
|
AssetManager类是我们上一篇文章中介绍的资源管理器。然后,上面的代码是显示了第一帧图片,8 帧显示完全需要 1 秒,也就是每隔 0.125 秒显示。
那么,完整的显示应该这么写:
1
2
3
4
5
6
7
8
9
10
11
12
| while(window.isOpen()) {
sf::Time deltaTime = clock.restart();
elapsedTime += deltaTime;
float timeAsSeconds = elapsedTime.asSeconds();
int animFrame = static_cast<int>((timeAsSeconds / animatorDuration) * framesNum) % framesNum;
sprite.setTextureRect(sf::IntRect(animFrame*spriteSize.x, 0, spriteSize.x, spriteSize.y));
}
|
首先,我们获取了上一帧到当前帧经过的时间,然后将其累加到 elapsedTime。最后两行代码决定了当前帧应该显示哪张图片。
(timeAsSeconds / animatorDuration) * framesNum 得到的是绘制到第几帧。因为每 animatorDuration/framesNum 绘制一帧。最后取整对 framesNum 取模得到第几帧(因为我们时间是一直累计的)。
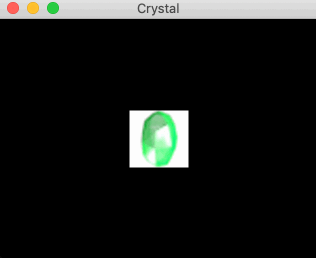
效果如下:
三、创建动画基类
但是,如果我们希望对其他的精灵类也取得同样的效果的话该怎么办?写一份跟上面一模一样的代码?显然,我们是不推荐这种做法的,因此,这里做个抽象,创建一个动画类(animator)。
这里,我们的动画类(animator)应该具备以下特点:
- 能让精灵实现动画
- 能够设置动画的周期以及一个周期需要的帧数
- 能够设置多个动画效果(animation)
- 能够切换动画效果(animation)
- 每个精灵有其对应的动画类
- 简单易用
- 能够自动选择当前显示的帧
因为我们对于每个动画类(animator)能够有多种类型动画效果(animation)。因此,动画效果使用结构体实现能够减少代码量。
动画效果(animation)需要有周期时间,帧列表,纹理,循环信息(是否是循环?)以及一个名称。因此Animation代码为:
1
2
3
4
5
6
7
8
9
10
11
12
13
14
15
16
17
18
19
20
21
22
| struct Animation {
std::string m_Name;
std::string m_TextureName;
std::vector<sf::IntRect> m_Frames;
sf::Time m_Duration;
bool m_looping;
Animation(std::string const& name, std::string const& textureName,
sf::Time const& duration, bool looping)
: m_Name(name), m_TextureName(textureName),
m_Duration(duration), m_looping(looping) {}
void AddFrames(sf::Vector2i const& startFrom,
sf::Vector2i const& frameSize, unsigned int frames) {
sf::Vector2i current = startFrom;
for (unsigned int i = 0; i < frames; i++) {
m_Frames.push_back(sf::IntRect(current.x, current.y, frameSize.x, frameSize.y));
current.x += frameSize.x;
}
}
};
|
AddFrames() 方法能够将图片按照水平方向切割成每一帧存入m_Frames。
现在来看看 Animator类的实现。这个类能够为精灵添加Animation。首先的话它能够创建和存储动画效果Animation,其次,由于Animation是基于时间变化的,它还需要一个Animatot::Update()方法去更新。最后,一个不是很重要的方法Animator::SwitchAnimation()能够切换动画效果。基于这些想法,我们的 Animator 类如下所示:
1
2
3
4
5
6
7
8
9
10
11
| private:
Animator::Animation* FindAnimation(std::string const& name);
void SwitchAnimation(Animator::Animation* animation);
sf::Sprite& m_Sprite;
sf::Time m_CurrentTime;
std::list<Animator::Animation> m_Animations;
Animator::Animation* m_CurrentAnimation;
|
先不看 FindAnimation() 和 SwitchAnimation() 这两个方法,后面会提到。
先来看看里面定义的数据, Sprite 不是定义在 Animitor 里面的实例,是一个引用。这意味着我们的精灵是在外部定义的,然后在 Animitor 的构造方法中获取这个引用。
其次,m_CurrentTime 是时间累加器,作用跟前面提到的一样。m_Animations 保存了所有动画效果,这里不用 vector 而是用 list 是因为 vector 不能不能保存指针或者引用类型。
再来看看其中的公有成员:
1
2
3
4
5
6
7
8
9
10
11
12
13
14
| public:
struct Animation {...};
Animator(sf::Sprite& sprite);
Animator::Animation& CreateAnimation(std::string const& name,
std::string const& textureName, sf::Time const& duration, bool loop = false);
void Update(sf::Time const& dt);
bool SwitchAnimation(std::string const& name);
std::string GetCurrentAnimationName() const;
|
Animation 定义在里面是因为它在外部并不会经常被用到,接下来是 Animator 的构造函数,传入的是 Sprite 的引用去初始化里面的 m_Sprite 字段。
Animator::CreateAnimation() 通过给定的参数创建一个动画效果。
Animator::Update() 能够在某一时刻获取正确显示的帧
Animator::SwitchAnimation() 能够为精灵切换动画效果
接下来看看实现具体实现
构造函数 Animator()
1
2
| Animator::Animator(sf::Sprite& sprite)
: m_Sprite(sprite), m_CurrentTime(), m_CurrentAnimation(nullptr) {}
|
Animator::CreateAnimation(),创建动画效果并存入 m_Animations 中。
1
2
3
4
5
6
7
8
9
10
11
| Animator::Animation& Animator::CreateAnimation(std::string const& name,
std::string const& textureName, sf::Time const& duration, bool loop) {
m_Animations.push_back(
Animator::Animation(name, textureName, duration, loop));
if (m_CurrentAnimation == nullptr)
SwitchAnimation(&m_Animations.back());
return m_Animations.back();
}
|
void Animator::SwitchAnimation()
1
2
3
4
5
6
7
8
| void Animator::SwitchAnimation(Animator::Animation* animation) {
if (animation != nullptr) {
m_Sprite.setTexture(AssetManager::GetTexture(animation->m_TextureName));
}
m_CurrentAnimation = animation;
m_CurrentTime = sf::Time::Zero;
}
|
bool Animator::SwitchAnimation()
1
2
3
4
5
6
7
8
9
|
bool Animator::SwitchAnimation(std::string const& name) {
auto animation = FindAnimation(name);
if (animation != nullptr) {
SwitchAnimation(animation);
return true;
}
return false;
}
|
Animator::Animation* Animator::FindAnimation()
1
2
3
4
5
6
7
8
| Animator::Animation* Animator::FindAnimation(std::string const& name) {
for (auto it = m_Animations.begin(); it != m_Animations.end(); it++) {
if (it->m_Name == name) {
return &*it;
}
}
return nullptr;
}
|
std::string Animator::GetCurrentAnimationName()
1
2
3
4
5
6
7
| std::string Animator::GetCurrentAnimationName() const {
if (m_CurrentAnimation != nullptr) {
return m_CurrentAnimation->m_Name;
}
return "";
}
|
void Animator::Update()
1
2
3
4
5
6
7
8
9
10
11
12
13
14
15
16
17
18
19
20
21
| void Animator::Update(sf::Time const& dt) {
if (m_CurrentAnimation == nullptr) return ;
m_CurrentTime += dt;
float scaledTime = m_CurrentTime.asSeconds() / m_CurrentAnimation->m_Duration.asSeconds();
int numFrames = m_CurrentAnimation->m_Frames.size();
int currentFrame = static_cast<int>(scaledTime * numFrames);
if (m_CurrentAnimation->m_Looping) {
currentFrame %= numFrames;
} else if (currentFrame >= numFrames) {
currentFrame = numFrames-1;
}
m_Sprite.setTextureRect(m_CurrentAnimation->m_Frames[currentFrame]);
}
|
四、使用 Animator
还是使用上面的图片来实现动画精灵
初始化部分
1
2
3
4
5
6
7
8
9
| sf::Vector2i spriteSize(118, 114);
sf::Sprite sprite;
Animator animator(sprite);
auto& idleAnimation = animator.CreateAnimation("Idle", "crystal.png",
sf::seconds(1), true);
idleAnimation.AddFrames(sf::Vector2i(0, 0), spriteSize, 8);
|
创建动画之前必须要有一个 sprite 实例,这个例子中我们添加了一个动画效果。动画效果的名字是 "Idle",使用的是 "crystal.png" 图片,设置它的动画周期为 1 秒且正在展示动画中。
展示部分
1
2
3
4
5
6
7
8
9
10
11
12
| sf::Clock clock;
while(window.isOpen()) {
sf::Time dt = clock.restart();
animator.Update(dt);
window.clear();
window.draw(sprite);
window.display();
}
|
效果跟前面的是一样的。
五、多个动画效果
创建一个动画效果的话很直观。那么如果是多个动画效果呢?
我们假设有这么一个场景,并且我们有两张图片:spriteSheet.png 和 myTexture.png,然后我们希望有 4 种动画效果。
代码如下:
1
2
3
4
5
6
7
8
9
10
11
12
13
14
15
16
17
| Animator animator(sprite);
auto& idleAnimation = animator.CreateAnimation("Idle", "spriteSheet.png", sf::seconds(1), true);
idleAnimation.AddFrames(sf::Vector2i(0, 0), spriteSize, 8);
auto& idleAnimationShort = animator.CreateAnimation("IdleShort", "spriteSheet.png", sf::seconds(0.5f), true);
idleAnimationShort.AddFrames(sf::Vector2i(0, 0), spriteSize, 8);
auto& idleAnimationSmall = animator.CreateAnimation("IdleSmall", "myTexture.png", sf::seconds(1.5f), true);
idleAnimationSmall.AddFrames(sf::Vector2i(64, 0), spriteSize, 3);
idleAnimationSmall.AddFrames(sf::Vector2i(64, 32), spriteSize, 2);
auto& idleAnimationOnce = animator.CreateAnimation("IdleOnce", "myTexture.png", sf::seconds(0.5f), false);
idleAnimationOnce.AddFrames(sf::Vector2i(0, 0), spriteSize, 8);
|
下面是通过键盘事件切换动画效果
1
2
3
4
5
6
7
8
9
10
11
12
13
| sf::Event ev;
while (window.pollEvent(ev)) {
if (ev.type == sf::Event::KeyPressed) {
if (ev.key.code == sf::KeyBoard::Key::Num1)
animator.SwitchAnimation("Idle");
else if (ev.key.code == sf::KeyBoard::Key::Num2)
animator.SwitchAnimation("IdleShort");
else if (ev.key.code == sf::KeyBoard::Key::Num3)
animator.SwitchAnimation("IdleSmall");
else if (ev.key.code == sf::KeyBoard::Key::Num4)
animator.SwitchAnimation("IdleOnce");
}
}
|
从上面的例子可以看到,Animator 类使得动画更易于管理,更重要的是,它具有极高的可扩展性。
示例代码在 Github
接下来我们将会介绍 摄像机 和 OpenGL,尽请期待😃。